How to Climb on Gritstone
- Sunday 6th October 2019
By Libby Peter
Where to find gritstone
Climbers flock from far and wide to sample British grit and it is Derbyshire, Staffordshire and Yorkshire that have been blessed with the greatest concentrations of the quality stuff. Though grit deposits were laid elsewhere, they don’t match this quality.
 Stanage Popular End. Photo: David Simmonite
How to climb gritstone
Above all else, climbing on gritstone forces you to use good technique. There’s no point being half-hearted on a grit route. It’s all or nothing, so it’s either immensely satisfying or cruelly humbling.
There’s nowhere to hide on grit. It flatters all your strengths but exposes all your technique weaknesses in three crucial areas – jamming, laybacking and smearing. If you want to learn about climbing cracks, arêtes or slabs there’s no better place to head. But if haven’t been initiated yet be warned – few virgin grit climbers make their debut elegantly.
Grit routes also typically require 100 per cent commitment. Despite the routes being short they’ll be high in value for money. Don’t be ashamed in having to drop at least a couple of grades to start with.
How to get gear in gritstone
It’s now inconceivable to imagine climbing on grit without cams but the pioneers were well and truly ‘ard as nails. I’ve often marvelled at their boldness as I’ve hurled in yet another bomber cam two feet above the last one. Although cams were the brainchild of Yosemite style granite crack climbers, they could as easily have been designed with grit in mind. The friction of the rock and uniformity of the cracks is a winning combination. If you pay attention to getting the correct size (mid-way in the cam’s expansion range) and alignment of the stem with the direction you might load it you’ll have yourself a secure placement. If you have the luxury of doubling up on sizes this can be a lifesaver on uniform cracks. The three cam versions can be useful in narrow pockets and shot holes and, just occasionally, a tri-cam itself is the only placement you’ll get.
Nuts are, in a lot of cases, fiddlier and less obvious than cams so you need to look carefully at the contours of the crack and check they’ve seated properly.
How gritstone is formed
Gritstone is a coarse textured form of sandstone but it deserves its own article because it gives us such distinctively unique climbing. It’s a sedimentary rock type that started out life on the floors of wide river deltas where the grit deposits were typically laid down, with every tide or flood dumping yet another layer of sediment. Mostly, these layers would be only as thick as the shifting currents allowed but, occasionally, conditions would change for a short while and a thick layer, many metres in some cases, would be laid down. These ancient sediment burials happened some 300 million years ago and they were subsequently overlain with and buried beneath bands of muds, coal and limestone. Over long periods of time and under great pressure these gritty sediments were eventually transformed into rock. The final piece of the jigsaw slotted into place when the areas were uplifted and then eroded to expose the resilient and magnificent bands of gritstone as the edges and tors we recognise today.
 Some exposures of gritstone are incredibly uniform and free from lines of weakness, a quality that made the rock type particularly useful for the quarrying of the distinctive millstones that were used to grind cereals. This uniform compact grit gives us some of our boldest chunks of rock to climb on, without the hint of a runner placement to look forward to.
Elsewhere the gritstone contains strata that create chinks susceptible to weathering. Once the process starts these blips grow ever deeper into breaks and later cracks, both horizontal and vertical.
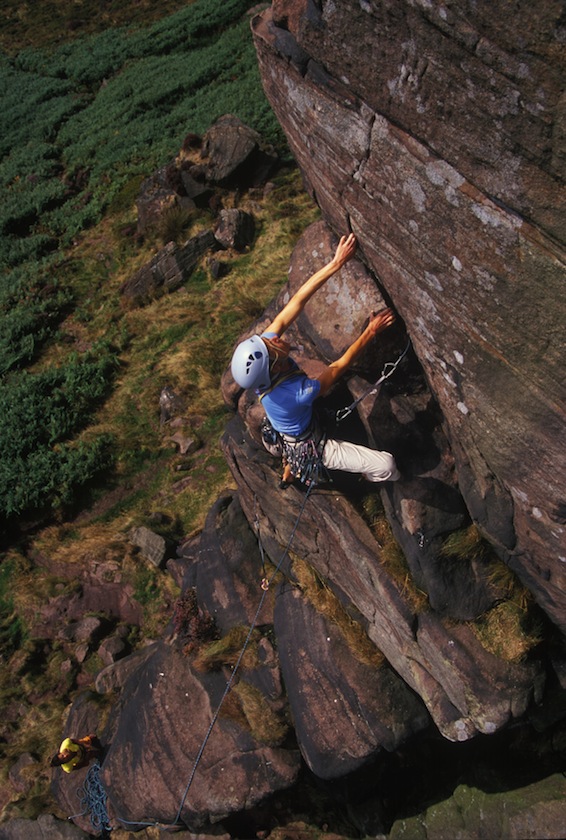
Libby Peter climbing at Hen Cloud in Staffordshire. Photo: Mike Robertson
Gritstone hazards
Ground falls are a constant threat on the diminutive gritstone cliffs so it’s essential you place gear as soon as you step off the ground and keep on placing it whenever you get the chance. Even then it’s not unheard of for belayers to be briefed to start running if their leader falls on particularly necky leads. Although not to be recommended, if this approach is a possibility make sure the first runner is multi-directional (a cam or thread) so it won’t simply rip out.
Cam-eating cracks are commonplace. If you place a cam too small for the crack it has a greater tendency to ‘walk’ further into the crack. Don’t place cams too deeply in the first place.
Belays are often perplexing. You can spend ages scuffing your knuckles trying to fiddle a wire into a crack whilst overlooking the obvious huge block to attach to. Using the rope itself to loop around the summit blocks is often the simplest and most secure solution.
Rope abrasion – the abrasive texture of gritstone is tough on ropes. Be particularly cautious when setting up top-ropes or holding repeated falls. Even rounded edges can and do cause serious damage to ropes.
Grit rash is an occupational hazard of stuffing your delicate hands into the rough sided cracks. Consider taping up if you have particularly soft skin or poor jamming technique!
Top gritstone crags and routes
The Roaches, Staffordshire is a lovely place to start. Even though it gets busy there is often a mellower feel than at some of the other 3-star crags. The bouldering is ace, the setting pretty and, of course, there are plenty of all-time classic routes:
- Pedestal Route (HVD), lovely and a rare two-pitch route with a belay under the roof of Sloth.
- Valkyrie (VS 4c) and worth every penny of that. Another multi-pitch journey that feels far longer than its meterage suggests.
- Sloth – the ultimate roof climb, but definitely more E1 than HVS 5b.
Almscliff, North Yorkshire would be, I’m sure, a terrifying place to start for most gritstone virgins. Windswept, almost desolate and with intimidating routes, yet also compelling. For a flavour try:
- Great Western (HVS 5a).
Once you’ve got a taste for grit there’s a lifetimes-worth of exploring to seek out and have fun on routes such as:
- The Peapod (HVS 5b), Curbar Edge, an amazing feature with a few baffling moves;
- Heather Wall (HVD) and Chequers Buttress (HVS 5b), Froggatt, stars galore;
- How to pick out a crack on Millstone Edge? Well my choice would be Regent Street (E2 5c);
- And then of course there’s Stanage, which is worthy of a separate article in its own right……well you might have to move to the Peak after all.
About Libby
Libby has been climbing for over 25 years, she is a qualified Mountaineering Instructor and IFMGA Guide and is the author of Rock Climbing – Essential Skills and Techniques published by MLTUK and Get Out On Rock with Neil Gresham, the definitive instructional DVD. You can find out more at www.libbypeterclimbing.co.uk

